The blogger contact form widget has some features such
as working speedily (send message to email account of blog owner
immediately), simple to work (no word confirmation).
You should add the contact form widget so that launching it on a specific page. Please omit these steps if you already have added it and who don’t added official blogger contact us widget can follow below steps.
1- Sign into your Blogger account and go to Layout option.
2- Now click on “Add a Gadget” link and “More Gadgets”.
3- Now find “Contact form New” page element and click on it.
4: Optionally if you want to change the title of the contact form widget, so alter it. Then click on “Save” button.
Now go to Template and click on the Edit HTML button.Then find and past paste below code just above of ]]></b:skin> code in the blogger template.
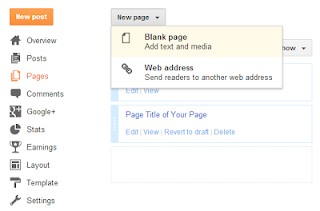
1- Click on ‘Pages’ tab on the left hand side.
2-Now click on New page >> Blank page.
3-Switch to HTML mode and click on ‘options’ tab on the right side. Then select the “Use <br> tag” option in the Line Breaks section like below.
4-Now paste below code on the empty Edit HTML field.
5- Last Save your static page.
1- Add contact form widget to Blog
You should add the contact form widget so that launching it on a specific page. Please omit these steps if you already have added it and who don’t added official blogger contact us widget can follow below steps.
1- Sign into your Blogger account and go to Layout option.
2- Now click on “Add a Gadget” link and “More Gadgets”.
3- Now find “Contact form New” page element and click on it.
4: Optionally if you want to change the title of the contact form widget, so alter it. Then click on “Save” button.
2- Hide contact us form widget in Blogger
The next work to do is hiding the official blogger contact form widget showing in the sidebar. So we have different methods to do it. One of the method is to remove the contact form html code. Although one day when you want to show it again in the sidebar, you might be confused by asking “How do I add removed contact form widget code to my blog?”. It is easy to add or remove whenever you want to show contact us form, you just need to remove the piece of CSS code given below from the template.Now go to Template and click on the Edit HTML button.Then find and past paste below code just above of ]]></b:skin> code in the blogger template.
#ContactForm1
{
display: none ! important;
}
3- Add Contact form widget on a Static Page
Now we’re going to add the contact form widget to a stand-alone page. Follow below steps and make customization in the bottom of the steps.1- Click on ‘Pages’ tab on the left hand side.
2-Now click on New page >> Blank page.
3-Switch to HTML mode and click on ‘options’ tab on the right side. Then select the “Use <br> tag” option in the Line Breaks section like below.
4-Now paste below code on the empty Edit HTML field.
<form name="contact-form">
<p></p>
Your Name:<br />
<input class="contact-form-name" id="ContactForm1_contact-form-name" name="name" size="30" value="" type="text" />
<p></p>
Your Email:
<span style="font-weight: bolder;color:red;">*</span><br />
<input class="contact-form-email" id="ContactForm1_contact-form-email" name="email" size="30" value="" type="text" />
<p></p>
Your Message: <span style="font-weight: bolder;color:red;">*</span><br />
<textarea class="contact-form-email-message" id="ContactForm1_contact-form-email-message" name="email-message" cols="25" rows="5"></textarea>
<p></p>
<input class="contact-form-button contact-form-button-submit" id="ContactForm1_contact-form-submit" value="Send" type="button" />
<p></p>
<div style="text-align: center; max-width: 222px; width: 100%">
<p class="contact-form-error-message" id="ContactForm1_contact-form-error-message"></p>
<p class="contact-form-success-message" id="ContactForm1_contact-form-success-message"></p>
</div>
</form>
Customization
- Change highlighted words with relevant your own words.(i.e: for Your Email,Type your Email address)
- Replace Required message instead of red color star symbols(*)( i.e: (required) )
- Change Send with wished text to be shown on Submit button.


It is not working for ME. I tried many times but i can not receive email through my blog.
ReplyDeletewww.alhaqtraders.blogspot.com